The Kubernetes Dashboard Project: Manage Clusters with Ease
Learn how the Kubernetes Dashboard simplifies cluster management with its intuitive and powerful UI
Written by:
Published on:
Jan 27, 2016Last updated on:
Jul 8, 2025Why a Kubernetes UI?
If you’ve looked at using containers in production, you’ve probably heard of Kubernetes, the open source container orchestration solution from Google. If you follow the Kubernetes tutorials, you’ll end up with a Kubernetes cluster deployed on Google Compute Engine quite quickly, but you’re still several pages of documentation away from deploying your own containers. Here at LiveWyer we’re very invested in the UI and usability side of Kubernetes, as we’d like our clients to be able to use the systems we’ve deployed for them with minimal effort.
The Kubernetes Dashboard Project
The Kubernetes Dashboard project (Github) aims to provide an easy to use Web UI, where you can define and deploy your applications on Kubernetes, check their state and troubleshoot them. The Dashboard is currently under heavy development, so this blog post can only offer a sneak preview of the final functionality. At the current early stage, the dashboard will allow you to deploy a single container application without any knowledge of what a Kubernetes API object looks like. You can also upload an existing YAML or JSON representation of a replication controller and the framework is in place for more functionality to be rapidly added.
Dashboard Design
The Dashboard is a minimalistic material design web application. The mockups that were presented to the Kubernetes UI SIG are available to browse in the Github repository, and the current state of the application is close to matching them in looks.
Kubernetes Dashboard - Let’s Get Started
If you’re just interested in running the dashboard, and already have a Kubernetes cluster running, we’ve built a container from a recent master branch. You can run it like so:
kubectl proxy --port=8080
docker run --net=host --rm -it livew.io/kubernetes-dashboard --apiserver-host http://localhost:8080
Then visit http://localhost:9090.
If you’re interested in hacking on the dashboard, or want to build it yourself, there are quite a few dependencies you’ll need to install. Feel free to skip this section if you have them already. You will need:
- Docker
- Go
- nodejs
npmgulp- Java
I recommend using nvm to install NodeJS 4.2.2, but you can use any methods you wish. If you’re running Ubuntu, I’ve included some quick scripts below to get you up and running as soon as possible:
# Install Docker
sudo apt-key adv --keyserver hkp://p80.pool.sks-keyservers.net:80 \
  --recv-keys 58118E89F3A912897C070ADBF76221572C52609D
sudo bash -c "echo deb https://apt.dockerproject.org/repo ubuntu-$(lsb_release --codename | cut -f2) main > \
/etc/apt/sources.list.d/docker.list"

sudo apt-get update && \
  sudo apt-get install docker-engine

# Install Golang
wget -O /tmp/go.tar.gz \
  https://storage.googleapis.com/golang/go1.5.3.linux-amd64.tar.gz
sudo tar -C /usr/local -xzf /tmp/go.tar.gz

echo "export PATH=$PATH:/usr/local/go/bin" \
  >> ~/.profile
mkdir -p ~/.gopath

echo "export GOPATH=~/.gopath" >> \
  ~/.profile
rm /tmp/go.tar.gz

# Install Java
sudo add-apt-repository ppa:webupd8team/java
sudo apt-get update
sudo apt-get install oracle-java7-installer

# Install Gulp
sudo apt-get update && \
  sudo apt-get install build-essential
wget -qO- https://raw.githubusercontent.com/creationix/nvm/v0.30.2/install.sh | bash
source ~/.nvm/nvm.sh
nvm install 4.2.2
source ~/.bashrc
nvm use 4.2.2
npm install gulp
Starting the Kubernetes Dashboard
Firstly, you’ll need to clone the repository and grab the dependencies using npm:
git clone https://github.com/kubernetes/dashboard && cd dashboard
npm install
Then you’ll need to set set up a Kubernetes cluster for the Dashboard to read from. You can simply run:
gulp local-up-cluster
to start a local cluster, or if you’re using Kubernetes already, you can use kubectl proxy to redirect any api calls
from localhost:8080 to your existing environment:
kubectl proxy --port=8080
Afterwards, run:
gulp serve
and visit:
open `http://localhost:9090`
Using the Kubernetes Dashboard
The first time you connect to a blank cluster, you should see something like this:
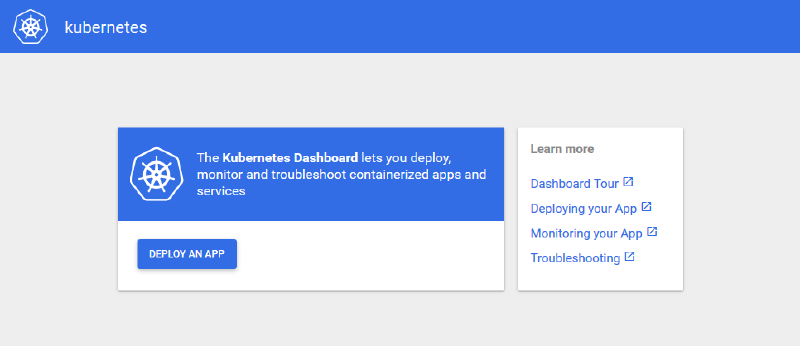
Figure - Dashboard screenshot 1
Or if you connect to an active cluster, the default view is an overview of the replication controllers. Here’s what it looks like when attached to our development cluster:
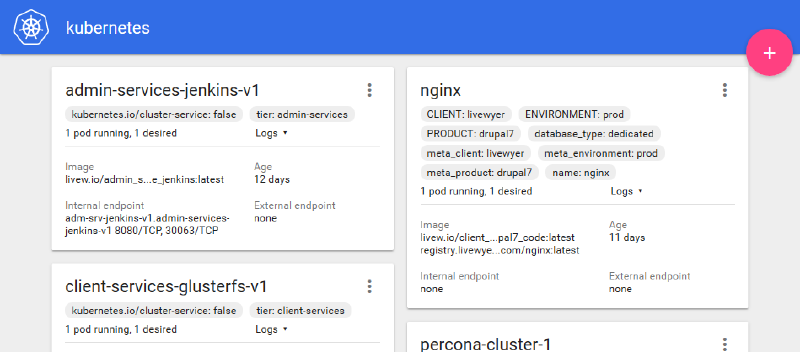
Figure - Dashboard screenshot 2
Let’s create a new application, either by clicking the “Deploy app” button or the material “+” button on the overview. This will take you to the following wizard:
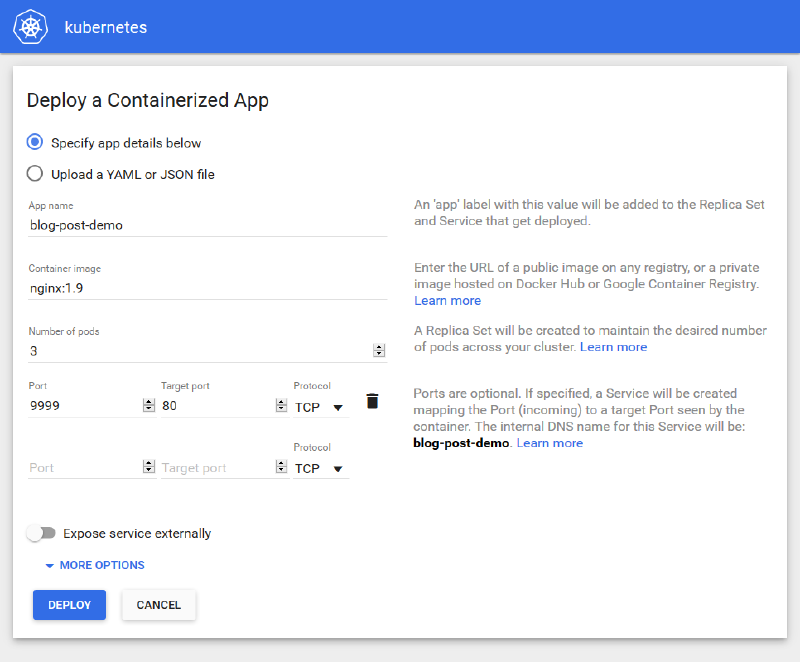
Figure - Dashboard screenshot 3
Here I’ve specifed the app name, image, number of pods and a port. Clicking deploy will result in a
ReplicationController and corresponding Service being created on the cluster.
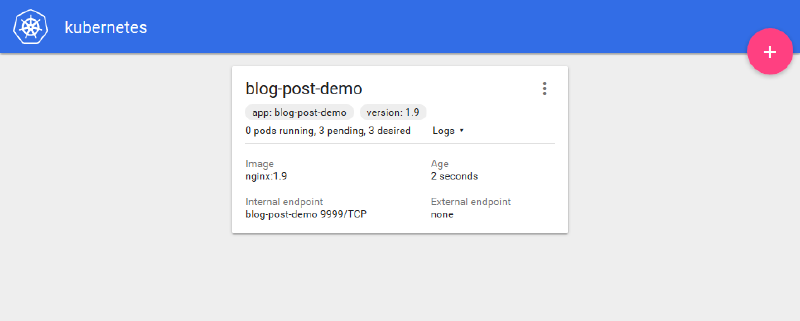
Figure - Dashboard screenshot 4
Hitting the internal endpoint will now send a request to one of the running nginx instances. With no knowledge of how
Kubernetes works, we’ve just deployed a container! You click the menu to scale, view details or delete the
ReplicationController you just created:
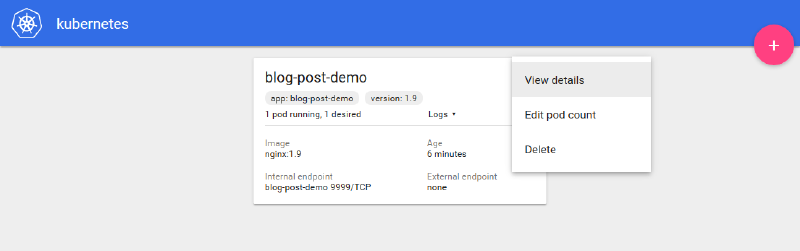
Figure - Dashboard screenshot 5
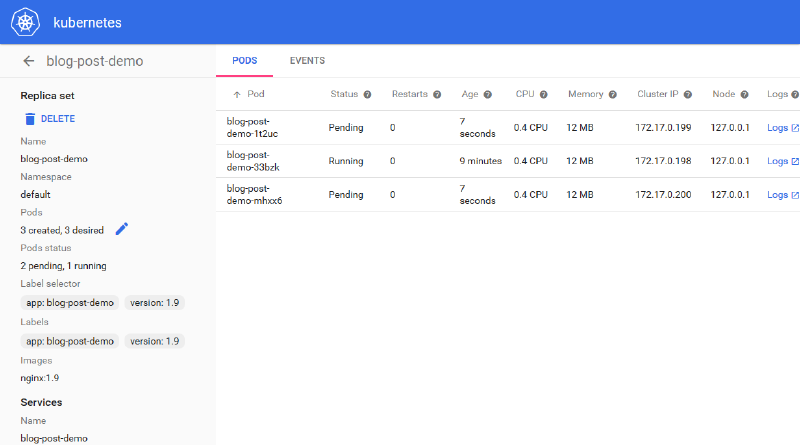
Figure - Dashboard screenshot 6
That’s all of the implemented functionality covered for now, but as the project is getting more commits every day, expect more features soon!
DevOps Engineer Final Thoughts
We think a UI that allows users unfamiliar with Kubernetes concepts to interact with a Kubernetes cluster will be a really important feature to encourage more companies to use it. We hope to be giving a talk on the direction of Kubernetes UI at the upcoming Kubecon 2016 in London. Feel free to hit us up there!