
Google Kubernetes: Introduction and First Impressions
The basics of Kubernetes: architecture, pod, replication controller, service
Written by:
Published on:
May 7, 2015Last updated on:
Jul 17, 2025Kubernetes History
When you’re running web apps at massive scale, you need some kind of orchestration and management tool, or rapid deployments are basically impossible. Google created their own cluster management system in-house, and christened it “Borg.” Back in 2010, during the early days of Mesos, some ex-exmployees of Google at Twitter started re-implementing Borg, which would eventually become the Apache Aurora Mesos framework. I covered it in the Deploy Docker Containers with Apache Aurora: Quick Guide blog post.
If you fast-forward to mid-2014, container / infrastructure as a service technologies are springing up all over the place, and Google chose this moment to release an open source version of Borg, called Kubernetes (the ancient Greek term for shipmaster.) While it has strong ties with Google compute engine, there’s nothing to stop you deploying it yourself, as we have done here at LiveWyer.
Kubernetes Design Choices
While Kubernetes is a container orchestration tool, you don’t deploy containers directly. Instead, Kubernetes introduces
the concept of a Pod - a tightly coupled group of containers that share network and IPC namespaces, and all have the
same hostname. The motivation for this model is to have your main container situated alongside several helper
containers, that might manage the configuration, logging, updating of the main process. This also allows the deployment
of services that need to share volumes, and allows you to keep to the idealised one process per container model - even
with legacy applications with complex dependencies. This also solves an issue we were having with Mesos, where having a
local filesystem follow a container was quite a difficult task. Now, we can simply specify it in the pod spec.
Each individual pod in the cluster has a unique IP address, so you avoid port collision when running multiple pods of
the same type.
An important thing to remember about individual pods is they’re not durable, and won’t survive node failures. In order to ensure failed pods are rescheduled, create a replication controller for your pod. This is also where you can scale your application, by specifying the number of replicas Kubernetes should maintain across your cluster
Kubernetes Architecture
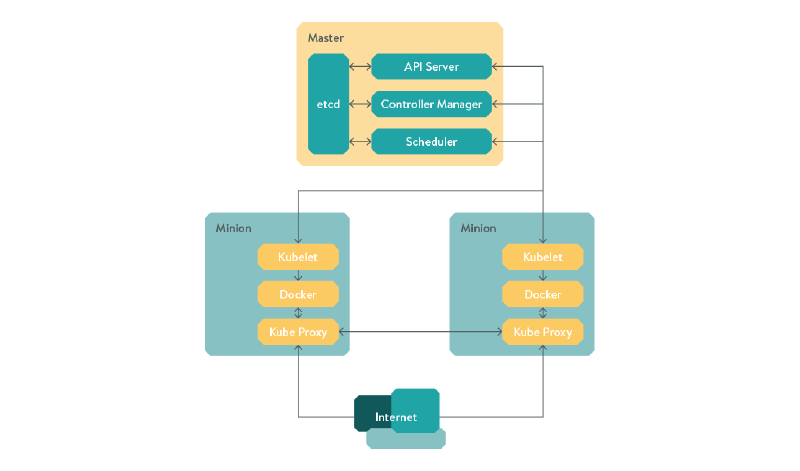
Figure - Kubernetes architecture
Kubernetes requires a key-value store to save the cluster state. etcd, a distributed key-value store
by CoreOS is used, but Kubernetes doesn’t strictly require all nodes to be running it, as long as they can all reach an
etcd API endpoint.
The Kubernetes master server consists of 3 components: The APIServer, the Controller Manager, and the Scheduler.
The API server is the RESTful interface to your cluster, which receives requests and writes them to etcd.
The Controller manager controls replication, and ensures the current cluster state mirrors the configuration defined in
etcd. Finally, the scheduler is responsible for spinning up pods across the nodes in the cluster, known as “minions”.
The minion servers must be running Docker, on a unique, dedicated subnet. Kubernetes also needs to have traffic routed between subnets across all minions. This is done automatically on GCE, but if you’re deploying on bare metal, CoreOS provides a routing service called flannel. We also had a prototype cluster working using Weave and I assume you could also achieve something similar with Open vSwitch. In the future, Kubernetes will support CoreOS Rocket as well as Docker.
Each minion also needs to run the “Kubelet” service and “kube-proxy.” The Kubelet service receives commands from the master and starts / stops containers, and kube-proxy is a userspace proxy allowing external access into the cluster by routing traffic to the correct containers based on the IP and port of the incoming request.
Kubernetes First Steps
There are 3 basic units you should need to get acquainted with to deploy services on Kubernetes, the Pod, ReplicationController and Service.
A pod, as described earlier, is the smallest deployable unit. Pod that contains a single container is defined as so:
nginx.yaml:
apiVersion: v1beta3
kind: Pod
metadata:
  name: nginx
  labels:
    name: nginx
    app: nginx
spec:
  containers:
  - name: nginx
    image: nginx:latest
    ports:
    - containerPort: 80
You could deploy this pod with the command kubectl create -f nginx.yaml, but you shouldn’t! Remember that pods are not durable, and there’s no guarantee a pod you schedule today will still be there tomorrow. The correct way to deploy this container on to your cluster is to define a replication controller, and then the controller manager will ensure that your specified containers are always running.
nginx-replicationcontroller.yaml:
apiVersion: v1beta3
kind: ReplicationController
metadata:
  name: nginx
spec:
  replicas: 2
  selector:
    app: nginx
  template:
    metadata:
      name: nginx
      labels:
        app: nginx
    spec:
      containers:
      - name: nginx
        image: nginx
        ports:
        - containerPort: 80
Deploy this with:
kubectl create -f nginx-replicationcontroller.yaml
and you should have 2 identical NginX pods running somewhere on your cluster. However, in order to expose your new pods outside the cluster you will need to create a service definition like so:
nginx-service.yaml:
apiVersion: v1beta3
kind: Service
metadata:
  name: nginx
spec:
  selector:
    name: nginx
  publicIPs: ["your.ip.address.here"]
  ports:
    - protocol: TCP
      port: 8080
      targetPort: 80
If you create the service with:
kubectl create -f nginx-service.yaml
and navigate to http://your.ip.address:8080, your request will get routed to one of the NginX servers in your cluster
and you should see the NginX welcome page!
DevOps Engineer Final Thoughts
Kubernetes design and specifications solve a lot of problems we were struggling with on Mesos, but not all the designed features are implemented yet. It’s definitely an exciting piece of technology and I look forward to future releases!